Summer is just around the corner, and for many of us here in Whatcom County and Skagit County, that means temperatures will soon be climbing and our air conditioning units will be kicking into high gear.
An AC that’s not properly prepped can struggle to keep up with our region’s heat and humidity, leading to higher energy bills and an uncomfortable home. That’s why getting your system tuned up and ready is crucial before the real summer swelter sets in.
The Pacific Northwest presents some unique climate challenges when it comes to residential air conditioning. Our proximity to ocean air brings higher humidity levels that tax AC systems harder as they work to wring moisture from the air. Seasonal winds can also deposit layers of dust and debris around outdoor units if not attended to. And let’s not forget about our local wildlife who may try to nest a little too close for comfort.
This guide will walk you through all the key steps to get your air conditioner in prime condition for summer duty, from crucial professional tune-up services to important homeowner maintenance tasks. We’ll look at the areas experts recommend focusing on given our local climate factors. You’ll learn quick tips for boosting efficiency and extending your AC’s lifecycle too.
With some simple preventative measures, you can avoid dreading the summer heat and energy bills. Just a little pre-season prep pays off big for cool, affordable comfort all season long.
Step-by-Step Guide to Air Conditioner Maintenance
Preparing your home’s air conditioner for summer doesn’t have to be a daunting task. By systematically going through some basic yet crucial maintenance items, you can ensure your system runs at peak performance when you need it most.
This checklist covers the essential steps – just be sure to adjust for your specific AC unit type.
Step #1: Inspect and Replace the Air Filter
Having a fresh, clean air filter is one of the most crucial and cost-effective steps for maintaining your air conditioner’s peak performance.
When filters get clogged with dust, pet hair, pollen, and other airborne particulates over time, it forces your AC system to work much harder just to pull air through the restricted pathways. Not only does this unnecessary strain increase energy consumption and drive up utility costs, it also causes undue wear and tear that can lead to premature breakdowns.
Just as importantly, clogged filters severely diminish your home’s indoor air quality by recirculating particles back into your living spaces. Those dust, mold spore and allergen concentrations aggravate respiratory issues for anyone with asthma or sensitivities. Nobody wants a house full of stale, contaminated air.
To avoid these problems and keep your air conditioning system operating smoothly all summer long, experts recommend following a disciplined air filter maintenance schedule based on usage levels.
Here in Whatcom and Skagit counties, where we experience elevated pollen and particulate levels carried in off the coastline and agricultural areas, it’s wise to check filters monthly and change them seasonally at a minimum.
For households with excess shedding pets, smokers, or struggling with poor outdoor air quality, you may need to swap those filters out every 6-8 weeks during the peak cooling months to stay ahead of accumulation.
The Filter Replacement Process
Replacing air filters only takes a few simple steps, but make sure you locate the proper replaceable filter first. This could be situated at the return air grill, somewhere along the ductwork run, or even in the air handler unit itself depending on the system design.
- Once you find the filter housing, carefully remove the existing filter and dispose of it properly.
- Use a vacuum hose to clean out any loose debris in the housing before installing the new replacement filter.
- Make sure to orient the new filter according to the airflow direction indicated on the housing or filter frame.
- For a snug fit that maximizes the filter’s sealing ability, take a measurement of the housing dimensions and purchase the appropriately sized filter at your local home improvement store.
Step #2: Clean the Condenser Coils
The condenser coils play a pivotal role in your air conditioning system’s heat removal process. These coils are essentially what allows the refrigerant to release and dissipate the heat it has absorbed from inside your home back out into the outdoor environment.
When condenser coils can’t efficiently release their thermal load outside, it puts tremendous strain on the entire AC system. The refrigerant has trouble fully condensing, so its cooling abilities to reabsorb more interior heat suffer too. This forces components like the compressor to work drastically harder while delivering less cooling power.
The harder your system struggles, the more energy it needlessly consumes – often increasing electrical costs by 30% or more. You’re paying a premium for subpar cooling. Even worse, this excessive stressing and heat buildup takes a major toll on parts like the compressor and coil fins themselves, leading to premature failures and mechanical breakdowns that require expensive repairs.
Proper Coil Cleaning Process
Avoiding these cooling catastrophes is as simple as dedicating a small amount of time each year to a thorough condenser coil cleaning.
- For safety, always turn off power to the outdoor unit at both the circuit breaker and disconnect switch before starting any coil work.
- Locate and remove the protective metal grille covering the condenser coils first.
- Use a soft-bristle brush to dislodge any loose debris, grass, seeds or bird nests you find accumulated on the coil fins and housing.
- For stuck-on grime, use a quality foaming coil cleaner to help dissolve and flush it away. You can also make a mild detergent solution by mixing a few ounces of dish soap into a gallon of water.
- Work this in using a soft-bristle brush, gently scrubbing between each coil fin to remove buildup.
- Avoid anything too abrasive that could bend or damage the delicate coil fins.
- Let the cleaner or soapy water soak briefly, then rinse everything thoroughly with a low-pressure garden hose nozzle.
Step #3: Check the Thermostat
Your home’s thermostat acts as the brain that tells the air conditioning system when to turn on and off in order to maintain your desired temperature settings. But if that thermostat isn’t working properly, you’ll end up with erratic cooling behavior at best and a system that won’t run at all at worst. That’s why it’s so important to inspect your thermostat annually.
Upgrading to Programmable Efficiency
If your existing thermostat is just a basic slider model, you may want to consider upgrading to a modern programmable or smart thermostat. These units allow you to input tailored cooling schedules and temperature preferences based on your home’s typical occupancy patterns.
Proper programming allows most households to trim annual cooling costs by up to 15% with a programmable thermostat.
Testing Thermostat Functionality
To test whether your thermostat is properly signaling your air conditioner’s control board, you’ll need to slightly lower the current temperature setting by a few degrees to prompt the cooling cycle to engage. Within a couple of minutes, you should hear the outdoor compressor unit fire up.
If the system doesn’t respond after giving it up to 15 minutes, you may have an electrical connection issue or a faulty control panel component that requires professional diagnosis and repair. Don’t let thermostat errors prevent you from maximizing cost-effective cooling!
Step #4: Inspect and Clean the Ductwork
Your home’s ductwork serves as the arterial pathways that distribute conditioned air from the HVAC system throughout your living spaces. But over time, dust, dander, pollen and other particles accumulate along duct walls, restricting airflow and reducing cooling efficiency. This buildup also compromises indoor air quality as those contaminants get recirculated back into your living areas.
Proper duct cleaning restores optimum airflow for improved cooling capacity and energy efficiency. More importantly, it eliminates those concentrated particulate buildup hotbeds, improving indoor air quality for a healthier home environment.
The Cleaning Process
While a handy homeowner can attempt some basic duct cleaning using vacuum brush attachments, a professional full-system cleaning provides much more effective and complete results. HVAC technicians utilize powerful truck-mounted HEPA vacuums combined with rotating brushes to dislodge and capture debris built up throughout the entire duct network.
They also have inspection cameras to check for unseen clogs, disconnects, or lining damage within ducts that require remediation. Leaky or poorly sealed ducts get tapered and reinstalled with laser alignment for optimum airflow too.
By fully sanitizing your entire ductwork system annually, you ensure your air conditioner operates at its most efficient and delivers only the cleanest, highest quality air to your home. Duct cleaning is an easy way to protect your cooling investment while breathing easier all summer!
Step #5: Clear Debris from the Outdoor Unit
For split or packaged air conditioning systems, the outdoor condenser unit plays a vital role in the cooling process by exhausting captured heat outside. But when debris builds up around the unit housing, it compromises airflow and insulates against effective heat release.
Here in Whatcom and Skagit counties, we face some unique debris challenges that demand more frequent outdoor unit maintenance. Our proximity to the marine environment means salt residues, sand, and organic material like seaweed frequently get blown onto beachside condensers. Agricultural areas also raise debris risks from waste straws, hulls, and other crop byproducts dispersing through fields.
Even inland, our lush vegetation and high seasonal pollen levels mean anything from fir needles to maple seed pods quickly accumulate around outdoor units if not attended to. After any windstorms, it’s wise to do a quick visual check clearing away any plant litter piled against the housing. The cleaner you keep that unit’s air intake pathway, the more optimally it performs.
The Cleaning Process
Before performing any condenser unit cleaning or maintenance, it’s crucial to first turn off power at both the unit’s dedicated electrical disconnect box and main circuit breaker for safety. Locate the condenser’s removable panels or protective grill covers and set them aside to allow full access.
Use a soft-bristle brush to dislodge any loose debris like twigs or leaves that have gathered inside the housing. For any stuck-on gunk, use a combination of your brush and a garden hose to gently wash everything away from the coils, fans, and housing interior. Avoid anything high pressure that could bend or damage delicate coil fins.
While you’re in there, take a few moments to check the condition of any exposed refrigerant lines, wiring harnesses, and other components for any signs of corrosion, nesting activity, or obvious damage that may require professional repair or replacement.
With minimal obstructions blocking airflow and a clean operating environment, your outdoor condenser unit will be primed to run at peak efficiency drawing heat away from your home’s interior. A cleaner unit is a cooler, happier home!
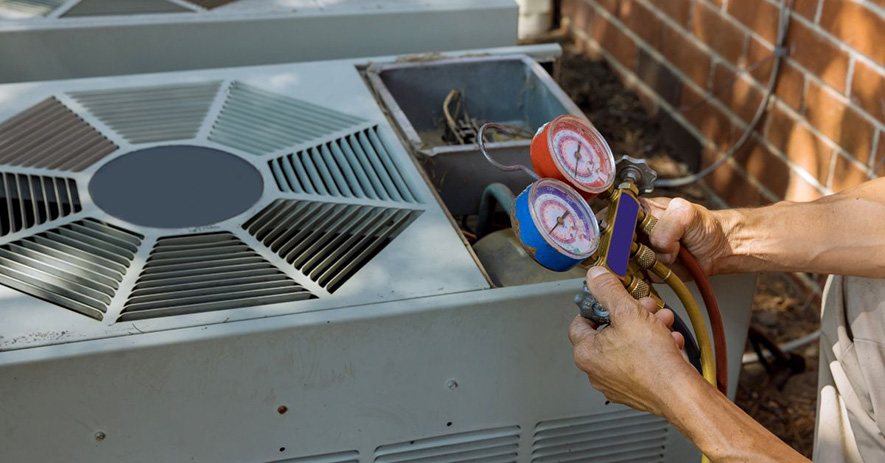
Step #6: Check Refrigerant Levels
Refrigerant is the liquid compound that facilitates the entire cooling process within your air conditioning system. As it circulates between the indoor and outdoor units, it repeatedly cycles between liquid and gaseous states – absorbing heat from inside your home which it then rejects outdoors before condensing back into liquid form to continue the cycle.
The Importance of Proper Refrigerant Levels
Having a sufficient refrigerant charge is absolutely vital for effective cooling performance. Too little refrigerant reduces the system’s heat transfer capabilities, preventing maximum cooling output. You’ll likely notice warm air blowing from vents despite the compressor running constantly.
Refrigerant leaks don’t just hamper cooling – they can actually cause components like the compressor to overheat from working overtime with that insufficient charge. This excessive stressing and cycling on/off leads to premature mechanical breakdowns that require expensive repairs.
Signs of Low Refrigerant
Since refrigerant lines are a closed system, your AC shouldn’t ever require you “topping it off.” If levels are low, that indicates a leak somewhere in the lines that needs professional repair. You may notice signs like:
- Inadequate cooling despite the system constantly running
- Coils freezing over as remaining refrigerant tries circulating
- A hissing or bubbling noise as the compressor struggles
- Water leaking around the indoor or outdoor units
It’s important to have refrigerant levels checked annually by an HVAC professional using precise measurement tools. They can properly identify any leaks, recharge the system, and ensure the entire refrigerant circuit is operating within designed pressure and temperature specifications for peak efficiency and longevity.
The Dangers of DIY Refrigerant Handling
While refrigerant itself isn’t a highly toxic compound, its delivery method requires professional handling to avoid exposure risks and environmental hazards. These systems hold refrigerant under immense pressure – attempting to recharge them yourself could result in serious injuries if mishandled.
There are also different refrigerant blends approved for different systems. Using the wrong refrigerant type or mixing incompatible blends can cause severe damage to system components and piping. Only certified HVAC technicians have the proper equipment, knowledge and protective gear to safely and legally work with air conditioning refrigerants.
Step #7: Tighten Electrical Connections
While often overlooked, ensuring all of your air conditioning system’s electrical connections remain tight and secure plays a crucial role in safe, efficient operation. Loose wiring creates resistance that generates excessive heat buildup, increasing fire risks and premature component failures.
How to Spot Potential Connection Issues
Loose electrical connections don’t always announce themselves with obvious indicators. But if you keep an eye out, there are some subtle signs that those power pathways could be working themselves free over time:
Ever notice a whiff of something slightly burnt or acrid when your AC kicks on? That odor could be heat buildup generated by resistance at loose connection points. If circuit breakers seem to be tripping more frequently too, excess resistance somewhere in the system wiring may be the culprit.
Sometimes you’ll get more evident clues like hesitant compressor startup when initiating cooling cycles. That laboring could stem from loose terminals failing to efficiently transfer electricity those first few moments. Visible corrosion, melting or deterioration around areas where wiring penetrates components also indicates potential connection issues.
Even if you can’t visibly trace it, excessive noise from outdoor fan motors or erratic condenser fan performance might be another red flag. As those connections loosen, intermittent power supply can cause motors to struggle inconsistently.
The key is keeping an ear and eye out for anything that seems amiss with your air conditioning system’s normal operational behavior and performance. Any of those little anomalies could potentially be traced back to loose electrical connections somewhere that require professional tightening before bigger problems arise. Don’t ignore the subtle signs!
The Tightening Process
With power securely disconnected, a technician will use a socket wrench to check and re-torque all electrical connections to manufacturer specifications throughout the indoor and outdoor units. This includes terminals within the service disconnect box, compressor housing, capacitor connections, and any junction boxes or control boards.
They’ll also examine the entire length of all visible wiring looking for any signs of insulation cracks, fraying, crimps or corrosion that necessitate wire replacement to eliminate potential resistance hot spots.
While a simple process, ensuring all those electrical paths of least resistance are tight, clean and uninhibited allows your system to operate seamlessly without excessive heat buildup or component strain. It’s an easy way to maximize cooling efficiency, increase service longevity, and prevent serious electrical fire hazards!
Step #8: Schedule for Annual Professional Maintenance
While you can absolutely handle plenty of basic air conditioner housekeeping yourself, there’s just no replacement for having a trained pro give your system a comprehensive once-over at least yearly. These HVAC technicians have spent years honing their craft, not to mention access to specialized tools and equipment we homeowners simply don’t possess.
Their expertise provides some major upsides:
- Ensuring every component operates at peak energy efficiency to keep utility costs down
- Catching small issues early before they escalate into premature system failures
- Thoroughly sanitizing coils, piping and other areas we can’t easily access to remove contaminants
- Checking for refrigerant leaks or electrical hazards most homeowners would overlook
- Precisely recalibrating and recharging to restore full factory-rated cooling power
In fact, most manufacturers mandate professional maintenance to keep those valuable equipment warranties valid. So in addition to the performance benefits, those yearly tune-ups actively protect the investment you’ve made in your home comfort system.
By methodically checking off this maintenance list, you’re setting your air conditioner up for reliable, efficient performance to get you through the dog days of summer.
Stay Cool All Summer with Proper A/C Prep
There it is – everything you need to get that home cooling system in tip-top shape before summer’s scorching temperatures settle in. We covered all the preventative maintenance musts, from cleaning coils and changing filters to checking those electrical connections and refrigerant levels. It’s a full checklist, but trust us, a little proactive work now saves you big-time headaches when that heat and humidity are bearing down.
Don’t let minor issues snowball into major headaches once temperatures really soar. Establish good air conditioning habits now – your household budget and personal comfort level will thank you. A few simple tasks greatly reduce surprise repair costs while keeping you and your family comfortable all season long.
That said, if any issues pop up that seem beyond your personal abilities or comfort zone, don’t hesitate to call in professional backup. Plenty of air conditioning problems require specialized tools and training to properly diagnose and repair things the right way. No need to create bigger headaches for yourself by pushing too far into unfamiliar territory.
Stay one step ahead of heat waves and humidity by getting your A/C summer-ready today. If you need assistance with any tune-up tasks or suspect larger cooling issues, the certified HVAC technicians at CPI Plumbing, Heating, Cooling & Electrical have you covered. Give us a call at (360) 822-9306 to schedule your service!